%@Auteur: François Meria\par
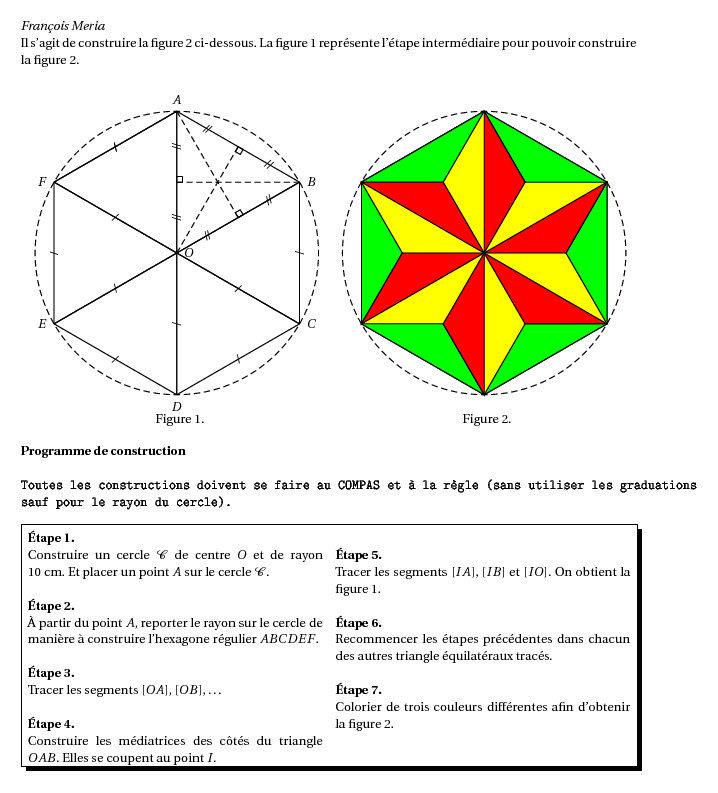
Il s'agit de construire la figure 2 ci-dessous. La figure 1
représente l'étape intermédiaire pour pouvoir construire la figure
2.

\begin{multicols}{2}
\begin{center}
\psset{unit=0.4cm}
    \pspicture(-11,-12)(11,11)
        \pstGeonode[PointSymbol=none,PosAngle={0,90}](0,0){O}(0,10){A}
        \pstCircleOA[linestyle=dashed]{O}{A}
        \pstInterCC[PointSymbol=none,PosAngleA=180]{O}{A}{A}{O}{F}{B}
        \pstInterCC[PointSymbol=none,PointNameB=none,PosAngleA=180]{O}{A}{F}{O}{E}{V}
        \pstInterCC[PointSymbol=none,PointNameB=none,PosAngleA=-90]{O}{A}{E}{O}{D}{W}
        \pstInterCC[PointSymbol=none,PointNameB=none]{O}{A}{D}{O}{C}{Z}
        \psline(A)(D)
        \psline(B)(E)
        \psline(C)(F)
        \pstSegmentMark[SegmentSymbol=pstslash]{A}{F}
        \pstSegmentMark[SegmentSymbol=pstslash]{A}{F}
        \pstSegmentMark[SegmentSymbol=pstslash]{E}{F}
        \pstSegmentMark[SegmentSymbol=pstslash]{B}{C}
        \pstSegmentMark[SegmentSymbol=pstslash]{D}{E}
        \pstSegmentMark[SegmentSymbol=pstslash]{D}{C}
        \pstSegmentMark[SegmentSymbol=pstslash]{O}{F}
        \pstSegmentMark[SegmentSymbol=pstslash]{O}{E}
        \pstSegmentMark[SegmentSymbol=pstslash]{O}{D}
        \pstSegmentMark[SegmentSymbol=pstslash]{O}{C}
        \pstProjection[CodeFig=true,CodeFigColor=black,PointSymbol=none,PointName=none]{O}{B}{A}[I]
        \pstProjection[CodeFig=true,CodeFigColor=black,PointSymbol=none,PointName=none]{O}{A}{B}[J]
        \pstProjection[CodeFig=true,CodeFigColor=black,PointSymbol=none,PointName=none]{A}{B}{O}[K]
        \pstSegmentMark[SegmentSymbol=pstslashh]{O}{I}
        \pstSegmentMark[SegmentSymbol=pstslashh]{I}{B}
        \pstSegmentMark[SegmentSymbol=pstslashh]{B}{K}
        \pstSegmentMark[SegmentSymbol=pstslashh]{K}{A}
        \pstSegmentMark[SegmentSymbol=pstslashh]{A}{J}
        \pstSegmentMark[SegmentSymbol=pstslashh]{J}{O}
        \pstInterLL[PointName=none,PointSymbol=none]{A}{I}{B}{J}{T1}
        \pstLineAB{T_1}{A}
        \pstLineAB{T_1}{B}
        \pstLineAB{T_1}{O}
        \put(-1.5,-12){Figure 1.}
    \endpspicture
\end{center}

\columnbreak

\begin{center}
\psset{unit=0.4cm}
    \pspicture(-11,-12)(11,11)
         \pstGeonode[PointSymbol=none,PosAngle={0,90},PointName=none](0,0){O}(0,10){A}
        \pstGeonode[PointSymbol=none,PointName=none](10,0){X}

        \pstCircleOA[linestyle=dashed]{O}{A}
        \pstInterCC[PointSymbol=none,PosAngleA=180,PointName=none]{O}{A}{A}{O}{F}{B}
        \pstInterCC[PointSymbol=none,PointNameB=none,PosAngleA=180,PointName=none]{O}{A}{F}{O}{E}{V}
        \pstInterCC[PointSymbol=none,PointNameB=none,PosAngleA=-90,PointName=none]{O}{A}{E}{O}{D}{W}
        \pstInterCC[PointSymbol=none,PointNameB=none,PointName=none]{O}{A}{D}{O}{C}{Z}
        \psline(A)(D)           \psline(B)(E)           \psline(C)(F)
        \pstLineAB{A}{F}        \pstLineAB{A}{F}        \pstLineAB{E}{F}
        \pstLineAB{B}{C}        \pstLineAB{D}{E}        \pstLineAB{D}{C}
        \pstLineAB{O}{F}        \pstLineAB{O}{E}        \pstLineAB{O}{D}
        \pstLineAB{O}{C}
        \pstProjection[PointSymbol=none,PointName=none]{O}{B}{A}[I]
        \pstProjection[PointSymbol=none,PointName=none]{O}{A}{B}[J]
        \pstProjection[PointSymbol=none,PointName=none]{A}{B}{O}[K]
        \pstLineAB{O}{I}
        \pstLineAB{I}{B}
        \pstLineAB{B}{K}
        \pstLineAB{K}{A}
        \pstLineAB{A}{J}
        \pstLineAB{J}{O}
        \pstInterLL[PointName=none]{A}{I}{B}{J}{T1}
        \pstOrtSym[PointName=none]{A}{O}{T1}[T2]
        \pstOrtSym[PointName=none]{O}{X}{T2}[T3]
        \pstOrtSym[PointName=none]{A}{O}{T3}[T4]
        \pstOrtSym[PointName=none]{O}{B}{T1}[T5]
        \pstOrtSym[PointName=none]{O}{F}{T2}[T6]
        \pspolygon[fillstyle=solid,fillcolor=green](A)(B)(C)(D)(E)(F)
        \pspolygon[fillstyle=solid,fillcolor=yellow](A)(T2)(F)(T6)(E)(T3)(D)(T4)(C)(T5)(B)(T1)
        \pspolygon[fillstyle=solid,fillcolor=red](A)(T1)(O)
        \pspolygon[fillstyle=solid,fillcolor=red](O)(T3)(D)
        \pspolygon[fillstyle=solid,fillcolor=red](B)(O)(T5)
        \pspolygon[fillstyle=solid,fillcolor=red](E)(T6)(O)
        \pspolygon[fillstyle=solid,fillcolor=red](F)(T2)(O)
        \pspolygon[fillstyle=solid,fillcolor=red](C)(T4)(O)
        \put(-1.5,-12){Figure 2.}
    \endpspicture
\end{center}
\end{multicols}

\textbf{Programme de construction }\\

{\texttt{Toutes les constructions doivent se faire au COMPAS
et à la règle (sans utiliser les graduations sauf pour le rayon du cercle).}}\\

\shadowbox{
\begin{minipage}[c]{\textwidth}
\begin{multicols}{2}\setlength{\columnseprule}{0.5pt}
\textbf{\'Etape 1.}\\
Construire un cercle $\mathcal{C}$ de centre $O$ et de rayon 10~cm. Et placer un point $A$ sur le cercle $\cal C$.\\

\textbf{\'Etape 2.}\\
À partir du point $A$, reporter le rayon sur le cercle de manière à construire l'hexagone régulier $ABCDEF$.\\

\textbf{\'Etape 3.}\\
Tracer les segments $[OA]$, $[OB]$, \ldots\\

\textbf{\'Etape 4.}\\
Construire les médiatrices des côtés du triangle $OAB$. Elles se coupent au point $I$.\\

\textbf{\'Etape 5.}\\
Tracer les segments $[IA]$, $[IB]$ et $[IO]$. On obtient la figure 1.\\

\textbf{\'Etape 6.}\\
Recommencer les étapes précédentes dans chacun des autres triangle équilatéraux tracés.\\

\textbf{\'Etape 7.}\\
Colorier de trois couleurs différentes afin d'obtenir la figure 2.\\

\end{multicols}
\setlength{\columnseprule}{0pt}
\end{minipage}
}