This document describes one method to install git under windows.
Programs to download
Supposing we start with nothing, there are three applications to be downloaded.
- msysgit
- This is the major application, you will find all necessary information on msysgit - Git for Windows. When writing this documentation, Git-1.7.6-preview20110708.exe was the proposed executable.
- PuTTYgen
- One of the programs of the PuTTY suite , this one will allow you to generate a pair of keys to transact with the machine Mélusine. You will find it on the PuTTY Download Page.
- TortoiseGit
- Interface for git. Very useful, it will specially integrate the transactions of the repositories within a context menu. You will find it on tortoisegit - Porting TortoiseSVN to TortoiseGIT.
Installation
Installation of msysgit
There is only one thing to do; start the installer and accept all the propositions that are made... Keep the path to this application in mind msysgit, you will be asked about that path, when configuring TortoiseGit. This application works in the background.
Installation of puttygen
In this case no installation, the downloaded application is the one that needs to be executed to generate a pair of keys.
This is the place to start generating your local repositories. Here is what I did to test the described procedure.
- Creation of a
GitSyracusefolder on the desktop with a subfolder namedkey. - Move the downloaded
puttygenexecutable into thekeyfolder.
Installation of TortoiseGit
After having started the installation procedure, a certain number of windows will open, in particular:
- Choice of the client SSH for TortoisePLink.
- Repository and its options, accept the propositions that are made.
Once this procedure is finished, you can see some changes in the context menu (right click). Three additional items appear: Git Clone..., Git Create repository here... and TortoiseGit (within a sub-menu).
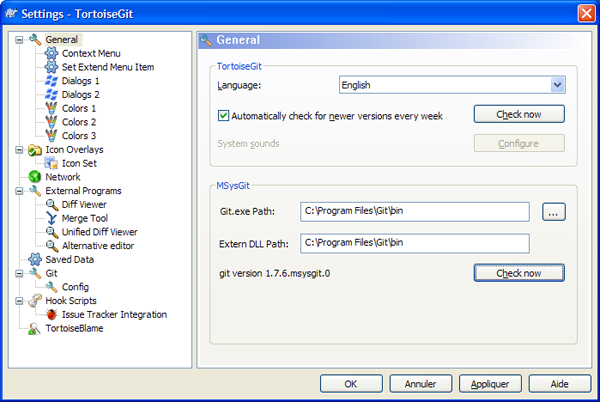
Now choose TortoiseGit > Settings, you will be asked to locate the application msysgit. This is the moment to enter the path to the \bin executable. You fill in the same path for the DLL. Clicking on Check you can verify that all is correct, the recognized version of msysgit will be shown.

Configuration of TortoiseGit
Coming back to that subject again, you can set up a more sophisticated configuration...
All is ready now on your machine to run git. You can clone repositories of which you find the address in the net and which don't need any authentification. You can also use git as a versioning system for your local projects; it is always helpful to be able to go back to old versions of documents or programms one has written...
Usage
Generation of a pair of keys
The interaction with the git folders of Syracuse1 use an SSH channel, you need to dispose a pair of keys for the transactions.
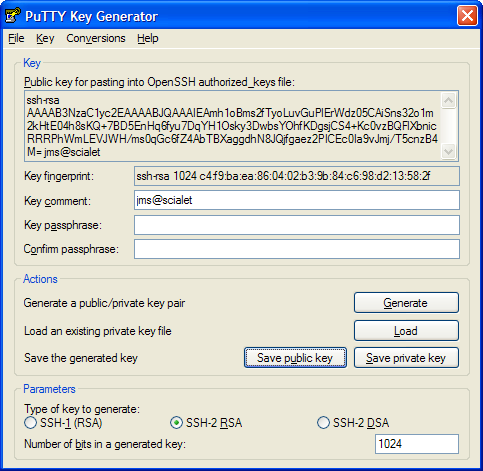
Go into the key folder and there click on the PuTTYgen icon. A dialog window opens, click on Generate, follow the instructions and you are ready, a pair of keys is disposed.

Generation of a pair of keys with PuTTYgen
Before you close the window:
- Fill in less anonymous the data field Key comment, choose a form like pseudo@lieu avoiding numerals. This comment serves for your identification in the configuration of a gitosis system (as the one of Syracuse).
- You will have the choice to add a passphrase to your pair of keys or you leave these two data fields empty. Adding a passphrase is an additional security; when you are sure that your private key won't get into the hands of an undelicate person, you can leave these data fields empty.
- Copy the content of the first data field Public key for pasting into OpenSSH authorized_keys file, paste it in a file with the name
pseudo@lieu.pub; this is the one that you communicate with on the projects of Syracuse, for example. Save the public key by clicking the button Save public key, this one can always serve. Il faut noter qu'il y a une petite différence dans le format avec le contenu évoqué à l'étape précédente.
Save the private key in the folderkey, it will be found there with the extension .ppk.
NOTE 1 – Vous gardez bien précieusement votre clé privée, you never communicate with this one! Both keys are coupled, so if you lose your private key2, you have to regenerate a whole pair.
NOTE 2 – For the users of Linux and windows vous pouvez convertir, à partir de cette même fenêtre, votre clé privée du format (Open)SSH2 vers le format PuTTY... This permits to transmit only one single public key.
Clone your first repository
It's time to start!
If you like to participate on a project of Syracuse, even published by Syracuse, send me your public key as an attachment via email.
Example
Supposing you like to participate on the project geshi.
- Let me know!
- Wait for confirmation that you are written in the list of contributors and that your key is registered by gitosis.
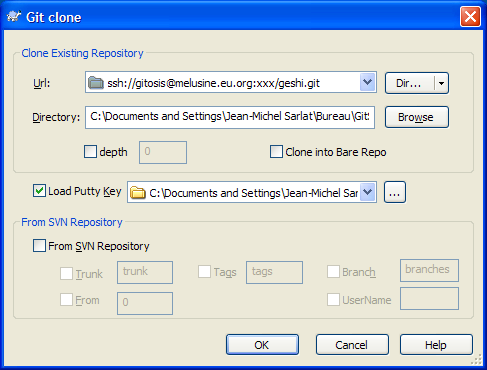
- Open your repository GitSyracuse, move the mouse over it and (right click) and choose Git Clone... in the context menu.
Within the data field Url type in the address

ssh://gitosis@melusine.eu.org:xxx/geshi.git3, the data field Directory must be filled in correctly, put a check mark in the box Load Putty Key and select your private key. Ok !
Normally a folder geshi will be generated, you now possess a copy of the project on which you can work on. What comes next is another story, another page...